If you’ve grown milkweed for monarch butterflies, watching the first seed pods develop is exciting. Harvesting your own seeds allows you to grow more plants for your garden, share them with friends, or help create additional habitat for monarchs and other pollinators.
The trick is knowing when to harvest.
Collect the pods too early, and the seeds may not be fully developed. Wait too long, and the pod will split open naturally, sending dozens of silky seeds floating away on the wind before you have a chance to collect them.
Fortunately, harvesting milkweed seeds is simple once you know what to look for.
In this guide, I’ll show you exactly when to harvest milkweed seeds, how to collect and store them successfully, and the common mistakes to avoid so you can enjoy growing even more milkweed in future seasons.
When Should You Harvest Milkweed Seeds?
The best time to harvest milkweed seeds is when the pods have turned tan or light brown and are just beginning to split open—but before the wind carries the seeds away.
For most milkweed species, seed pods take about one to two months to mature after flowering, although the exact timing depends on the species and your local weather.
While this article uses Butterfly Weed (Asclepias tuberosa) as an example, the same harvesting method works for most native milkweed species commonly grown in Texas, including Antelope Horns, Green Milkweed, and Swamp Milkweed.
See Texas Native Milkweed: The Best Species to Plant for Monarchs (Zone 8 Guide) for more information on the different native types that are best for this region.
Learning to recognize the different stages of milkweed pod development is the easiest way to know when it’s time to harvest.
How to Tell When Milkweed Pods Are Ready
| Pod Stage | Ready to Harvest? |
|---|---|
| Bright green, firm pods | ❌ Too early. Seeds have not fully matured. |
| Light green to yellow-green pods | ❌ Continue waiting. |
| Tan or light brown pods that feel full | ✅ Ideal harvest stage. |
| Pods beginning to split naturally | ✅ Harvest immediately before seeds disperse. |
| Fully opened pods with silky fluff blowing away | ⚠️ Still possible to collect, but some seeds may already be lost. |
As the pods mature, you’ll notice several changes. They gradually lose their bright green color, becoming lighter and eventually tan. The pods also become plump and may begin to split slightly along one seam.
That’s your signal to harvest.
If you’re unsure whether the seeds are mature, gently open one pod and examine the seeds inside. Healthy, mature seeds are typically dark brown. Pale cream or white seeds haven’t finished developing and are unlikely to germinate successfully.

Green milkweed pods with seeds inside that are still developing and not ready for harvest yet.
Why Timing Matters
Milkweed has developed an incredible way of spreading its seeds.
Each seed is attached to a tuft of silky white fibers that acts like a tiny parachute. Once the pod opens, even a light breeze can carry the seeds surprisingly far from the parent plant. This natural strategy helps milkweed colonize new areas, but it can make harvesting frustrating if you wait too long.
Checking your plants every few days as the pods begin changing color helps you catch them at exactly the right stage. If you’re expecting strong winds or storms, it’s often better to harvest a pod that’s just beginning to ripen than to risk losing all of the seeds after the pod bursts open naturally.
My Experience Growing Butterfly Weed
One of my favorite native plants in my garden is Butterfly Weed (Asclepias tuberosa). I originally grew it from seed started indoors, and after becoming established, it began producing bright orange flowers that attracted butterflies, native bees, and many other pollinators throughout the summer.
A few months after flowering, the plants rewarded me with their first seed pods.
Watching those pods mature gave me the opportunity to collect seeds and grow even more milkweed without purchasing additional plants. It’s one of the most rewarding parts of growing native milkweed, especially knowing that every new plant can provide habitat for future generations of monarch butterflies.
Step-by-step instructions for how to grow milkweed from seed: How to Germinate Milkweed Seeds.

Orange milkweed (Asclepias tuberosa), also called butterfly weed, a native milkweed species, in bloom.
Full Instructions: How to Harvest Milkweed Seeds
Step 1: Let the Plant Flower and Watch the Seed Pods Develop
The first step is simply allowing nature to take its course.
After the flowers have finished blooming and been pollinated, long seed pods will begin developing along the stems. At first, these pods are bright green, smooth, and resemble oversized pea pods.
Although it can be tempting to harvest them right away, patience is important. Depending on the milkweed species and growing conditions, it generally takes one to two months after flowering for the seeds inside the pod to fully mature.
During this time, continue watering the plant as needed and allow the pods to remain undisturbed. Healthy plants will naturally direct energy into producing viable seeds.
Step 2: Wait Until the Pods Are Fully Mature
This is the most important step in the entire process. Immature pods contain seeds that haven’t fully developed and often won’t germinate. Fortunately, milkweed gives several visual clues when it’s ready.
As the pods mature, they gradually:
- Change from bright green to tan or light brown.
- Become plump and firm.
- Begin to dry slightly.
- Develop a seam that may just start to crack open.
The goal is to harvest just before the pod opens completely. If you wait until the silky fluff is already escaping, the wind may carry many of the seeds away before you have a chance to collect them.
If you’re unsure whether a pod is mature, gently open one and look at the seeds.
- Dark brown seeds are mature and ready to harvest.
- White or pale cream seeds usually aren’t fully developed and are unlikely to germinate successfully.
Checking your plants every few days during late summer and fall makes it much easier to harvest pods at the ideal stage.

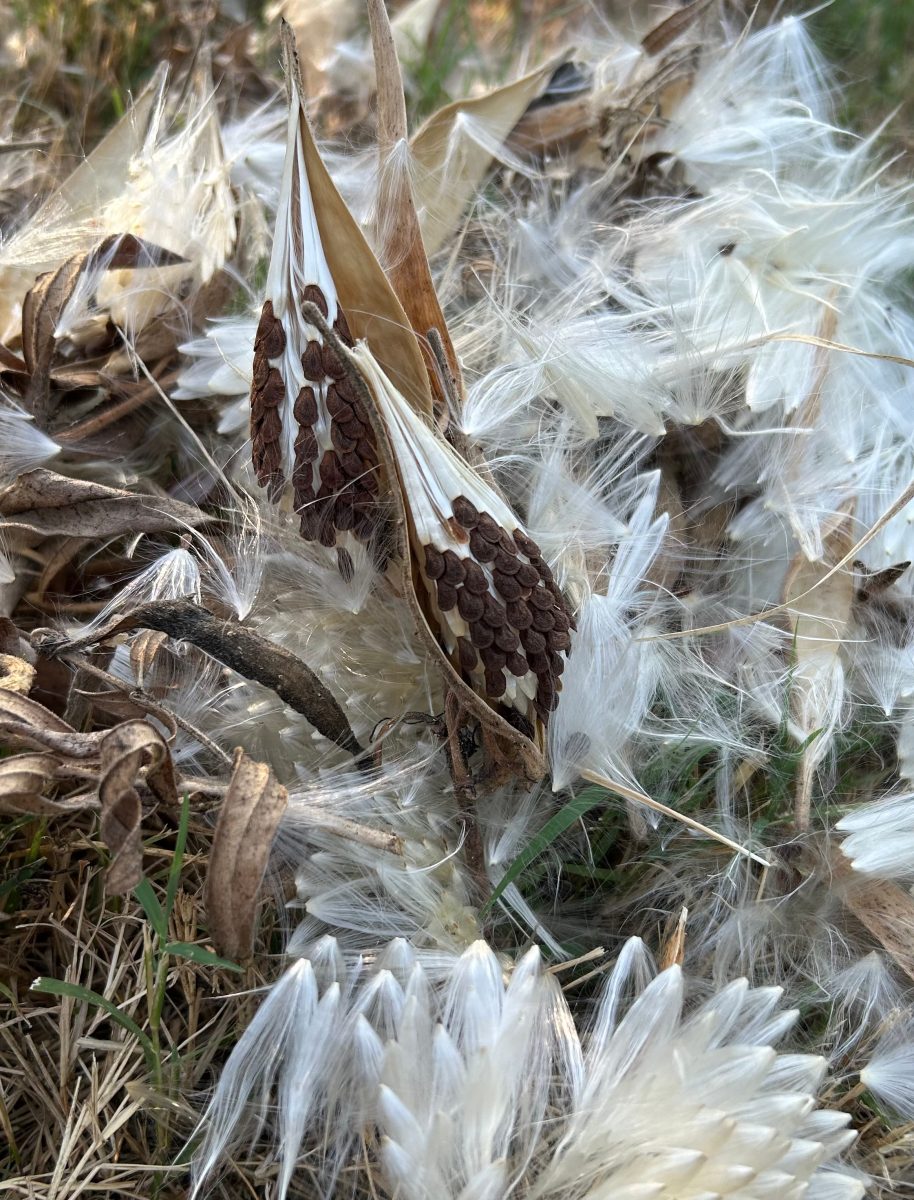
Ripening milkweed seed pod turning brown and releasing its first dark brown seeds.
Step 3: Harvest the Pods
Once the pods have reached the proper stage, simply snip them from the plant using clean scissors or hand pruners. Leave a short section of stem attached to the pod if possible. This makes them easier to handle while drying.
If rain is expected or several pods are beginning to split at once, it’s better to harvest them a day or two early than risk losing your seeds to wind or wet weather.
Place the harvested pods into a paper bag, cardboard box, or shallow basket where air can circulate freely. Avoid sealing fresh pods inside plastic bags or airtight containers, as trapped moisture can encourage mold while they’re drying.
Step 4: Allow the Pods to Dry
If your pods weren’t already splitting naturally when harvested, allow them to dry indoors for one to two weeks.
- Choose a warm, dry, well-ventilated location out of direct sunlight.
- As they dry, the pods will slowly begin opening along one seam.
- Once fully dry, the seeds will separate much more easily from the silky fibers.
Resist the urge to rush this step. Properly dried pods make seed cleaning much easier and help ensure the seeds store well over the winter.

Fully dried milkweed seed pods ready to have seeds harvested from fluff.
Step 5: Remove the Seeds from the Fluff
Once the pods have opened, you’ll see the familiar silky white fibers attached to each seed. This silky material helps milkweed disperse naturally on the wind, but it can make collecting seeds a little messy.
One simple method is to pinch the top of the silky tuft firmly between your fingers while gently pulling downward with your other hand. The seeds usually separate easily once the pods are completely dry. Take your time. Trying to rush this step often sends seeds floating around the room.
After separating the fluff, inspect the seeds one final time. Healthy seeds should be:
- Dark brown
- Flat and firm
- Free of mold or moisture
Discard any seeds that appear shriveled, soft, or unusually pale.
Once cleaned, your milkweed seeds are ready for storage until planting time.
By this point, you’ve successfully harvested and cleaned your milkweed seeds. In the next section we’ll cover the best way to store them, common mistakes to avoid, whether they need cold stratification before planting, and answer some of the most frequently asked questions about harvesting milkweed seeds.

Pinching the fluff together while pulling the seeds off is an easy collection method.
Common Mistakes When Harvesting Milkweed Seeds
Even though harvesting milkweed seeds is straightforward, a few common mistakes can reduce germination or cause you to lose many of the seeds before you ever get a chance to plant them. Fortunately, they’re all easy to avoid once you know what to look for.
Harvesting Pods Too Early
The most common mistake is harvesting pods while they’re still green. Although the pods may appear full-sized, the seeds inside often haven’t finished developing. Immature seeds are usually white, cream-colored, or pale tan instead of the rich dark brown color of mature seeds.
When in doubt, it’s almost always better to wait a little longer. Watching the pods every few days as they begin changing color will help you harvest them at the ideal stage.
Waiting Too Long
The opposite problem is just as common. Milkweed has adapted to spread its seeds by wind. Once the pod splits open naturally, dozens of silky seeds can quickly drift away.
If you notice a pod beginning to crack open, harvest it as soon as possible. Even if a few seeds have escaped, you’ll usually be able to save the majority before they’re carried away.
Storing Damp Seeds
Seeds should always be completely dry before long-term storage.
Placing damp seeds into sealed plastic bags or airtight containers can trap moisture and encourage mold. Instead, allow the seeds to dry thoroughly before storing them in labeled paper envelopes or paper seed packets in a cool, dry location.
Forgetting to Label Your Seeds
If you grow more than one species of milkweed, it’s surprisingly easy to forget which seeds came from which plant.
Take a moment to label each envelope with:
- The species name
- The date collected
- Where the seeds were collected (optional)
You’ll be grateful for the extra organization when planting season arrives.
How to Store Milkweed Seeds
Once the seeds are completely dry, proper storage helps maintain their viability until you’re ready to plant them.
Paper envelopes, seed packets, or small paper bags all work well because they allow any remaining moisture to escape.
Store the seeds somewhere that is:
- Cool
- Dry
- Dark
- Protected from humidity
Many gardeners keep seed envelopes inside an airtight container with a small silica gel packet for additional moisture protection, although this isn’t essential if the seeds were thoroughly dried beforehand.
Properly stored milkweed seeds can remain viable for several years, although the highest germination rates are usually achieved with fresher seed.
Do Milkweed Seeds Need Cold Stratification?
Many native milkweed species benefit from a period of cold, moist stratification before spring planting. This process mimics the natural conditions seeds experience outdoors during winter and can improve germination rates for many species.
However, not every milkweed species has identical requirements.
If you’re planning to grow milkweed from seed, be sure to read our guide on How to Germinate Milkweed Seeds, where we explain which species benefit from cold stratification and how to do it successfully.
Frequently Asked Questions
Can I harvest green milkweed pods?
It’s best to wait. Green pods often contain immature seeds that haven’t fully developed and may not germinate successfully.
How do I know if milkweed seeds are mature?
Mature seeds are typically dark brown, flat, and firm. White or pale-colored seeds usually haven’t finished developing.
Can I collect seeds after the pod opens?
Yes. If the pod has only recently opened, you can often collect many of the seeds before they’re carried away by the wind.
How long do milkweed seeds stay viable?
When properly dried and stored in a cool, dry location, milkweed seeds often remain viable for several years, although fresher seed generally produces the best germination rates.
Will every milkweed flower produce a seed pod?
Not always. Successful seed production depends on pollination, and it’s perfectly normal for many flowers not to develop pods.
Harvest Checklist
Before storing your seeds, make sure you’ve completed these steps:
- ✓ Harvested pods after they turned tan.
- ✓ Allowed pods to dry completely.
- ✓ Removed the silky fluff from the seeds.
- ✓ Selected mature, dark brown seeds.
- ✓ Labeled each seed packet with the species and collection date.
- ✓ Stored seeds in a cool, dry place until planting season.

Monarch butterfly caterpillar eating an orange milkweed leaf in a Texas butterfly garden.
Conclusion
Harvesting milkweed seeds is one of the easiest and most rewarding ways to expand butterfly habitat in your own backyard.
With just a little patience, you can collect hundreds of viable seeds from a healthy plant and grow even more milkweed for future seasons. Whether you plant them yourself, share them with friends, or donate them to a community garden or native plant sale, every new milkweed plant has the potential to support monarch butterflies and many other pollinators.
The key is simply harvesting at the right time. Wait until the pods have matured, turned tan, and are just beginning to split, then dry and store the seeds properly until planting season arrives.
Growing milkweed from seed requires a little planning, but it’s one of the most satisfying ways to create lasting butterfly habitat. It’s hard to beat the feeling of watching a plant you grew from seed become the next generation of host plants for monarch caterpillars.
If you are planning or planting this season, the Butterfly Garden Cheat Sheet can help you check that the basic habitat pieces are in place.
Related Guides:
If you’re interested in growing more milkweed and creating a thriving butterfly garden, these guides can help:
How to Care for Milkweed: A Complete Guide for Healthy Monarch Host Plants
How to Germinate Milkweed Seeds
Monarch Host Plants vs. Nectar Plants: A Simple Beginner Guide
The Complete Guide to Butterfly Gardening: How to Attract, Feed, and Protect Butterflies All Year
Leave a Reply