

Keyhole gardens are one of the most efficient, water-wise, nutrient-recycling garden designs ever invented. Originally popularized in arid regions of Africa, keyhole gardens have become increasingly common in Texas—especially among gardeners in hot, drought-prone climates like Zone 8. Their circular, raised-bed shape and built-in composting basket make them perfect for gardeners who want to grow more food or flowers with less water, less maintenance, and less soil amendments.
Whether you are a beginner ready to build your first raised bed or an experienced gardener looking to maximize productivity in a small space, a keyhole garden is a smart, sustainable, and rewarding project.
This Guide Will Walk You Through:
• What a keyhole garden is
• Why they work so well in Texas
• Materials you need
• Step-by-step building instructions
• Soil layering techniques
• What to plant (flowers, herbs, and veggies)
• Long-term care tips

Layers of the keyhole garden demonstrated.
What Is a Keyhole Garden?
A keyhole garden is a circular raised bed with a notch cut out of one side—creating a shape that looks like an old-fashioned keyhole when viewed from above. At the center sits a vertical compost basket. Kitchen scraps, water, and compostable materials are added to this basket, which slowly release nutrients outward into the garden soil.
Key Features
• Round raised bed, usually 5–8 feet across
• Central compost basket made of wire or mesh
• Walkway notch that allows access to the compost basket
• Layered soil construction, similar to hugelkultur
• Highly water-efficient, perfect for drought climates
Why Keyhole Gardens Are Perfect for Zone 8 Texas
Texas gardeners face several challenges: scorching summers, unpredictable rain, alkaline soils, and the need for drought-resilient systems. Keyhole gardens solve many of these problems naturally.
Benefits
• Conserves Water
The central compost basket helps distribute moisture efficiently.
• Builds Rich Soil Naturally
Layering organic materials allows soil building without having to dig into hard ground, creating loose, productive soil ideal for vegetables, herbs and flowers.
• Withstands Heat and Drought
The raised structure insulates roots, drains well, and retains moisture and nutrients.
• Supports Pollinators
You can plant a mix of veggies, herbs, and nectar plants for butterflies.
• Great for Small Spaces
Even a tiny yard can fit one.
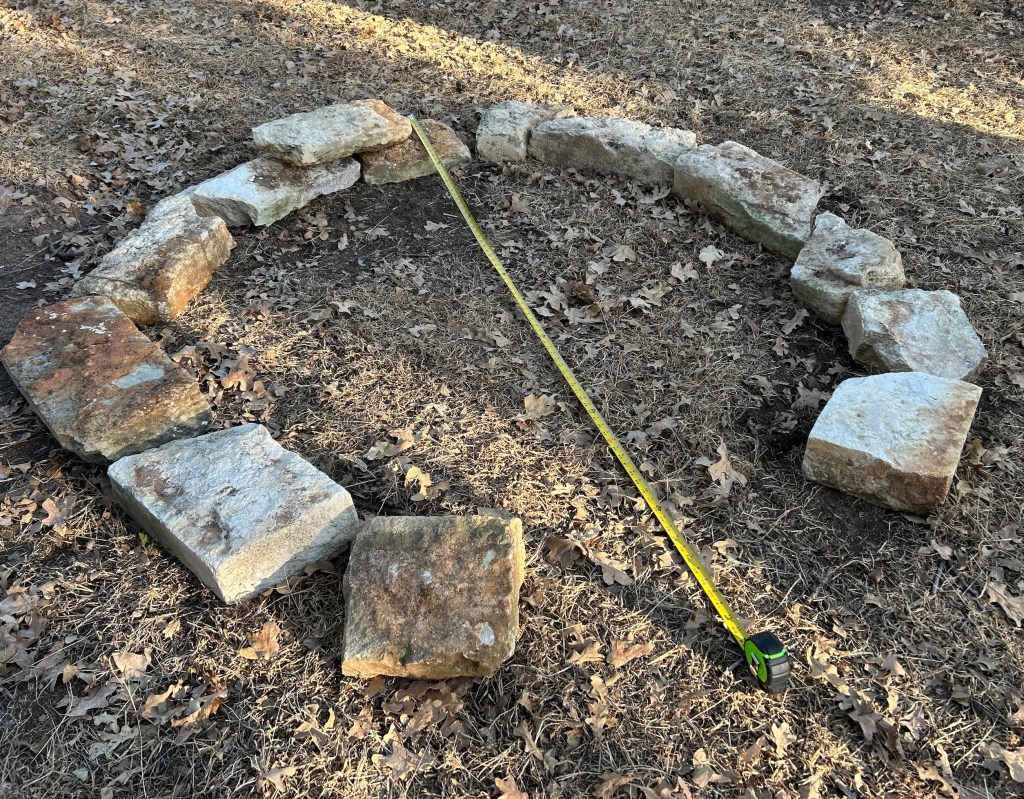
Measuring and laying out the foundation
Materials Needed:
The beauty of this project is that can build a keyhole garden with budget-friendly or reclaimed materials. The exact materials are not important as long as you can make a stable structure able to hold soil. Below is a flexible materials list—adjust based on what you have.
Garden Bed Walls (Choose One)
• Large rocks or fieldstone
• Bricks
• Cinder blocks
• Wood boards (cedar preferred)
• Galvanized raised bed rings
Central Compost Basket
• 3–4 feet of hardware cloth or wire fencing
• Zip ties or wire
• Optional: stakes to secure it in place
Organic Layering Materials
These create the internal structure:
• Cardboard or newspaper
• Logs, sticks, or woody debris
• Dried leaves or straw
• Grass clippings
• Compost, leaf mold, or garden soil
Need more soil? Learn how to make DIY leaf mold from fallen leaves and yard debris.
Tools
• Shovel
• Wheelbarrow
• Gloves
• Pruners (for trimming woody material)

Finished keyhole garden with basil, kale, and amaranth planted.
Step-by-Step: How to Build a Keyhole Garden
Step 1: Choose the Location
Select a sunny spot with 6–8 hours of light per day. Because the garden is round, it performs well even if your yard has tricky angles.
Avoid placing it under trees or next to large roots—those will compete for moisture.
Step 2: Mark the Garden Shape
Most keyhole gardens are 6 feet wide, which is the perfect size for reaching the center without stepping inside the bed.
1. Place a stake in the center.
2. Tie a 3-foot string to the stake.
3. Walk around in a circle with the string taut to mark the boundary.
4. Mark a 1.5–2 foot wide notch on one side—that is your access walkway.
Step 3: Build the Wall
Stack your chosen wall material around the circle, leaving the notch open.
• If using stone, dry-stack the rocks securely.
• If using wood, build a circular or hexagonal frame.
• If using blocks, stagger the seams for strength.
Aim for 18–30 inches high. This depth insulates roots and reduces watering needs.
Extra tip: to prevent leakage, the walls and compost basket can be lined with cardboard if needed.
Step 4: Install the Compost Basket
Form a cylinder from your hardware cloth, about 12–16 inches wide and 2–3 feet tall.
Place it at the center of your circle and secure it with stakes if needed.
This is the heart of the garden—nutrients and water will seep through this basket over time.

Partway finished keyhole garden. Compost basket is added first followed by course debris for the bottom layer.
Step 5: Layer the Soil (The Lasagna Method)
This is where keyhole gardens shine. Begin filling the bed with biological layers:
1. Bottom layer: Cardboard or newspaper (suppresses weeds)
2. Wood layer: Logs, branches, sticks (facilitates drainage)
3. Brown layer: Dried leaves, straw, shredded paper
4. Green layer: Grass clippings, kitchen scraps, manure
5. Top layer: Compost + garden soil (6–8 inches)
As these layers break down, they create a spongy, rich soil system that holds moisture beautifully.
Step 6: Add Compost to the Basket
Fill the central basket with alternating layers of:
• Vegetable scraps
• Coffee grounds
• Crushed eggshells
• Dead leaves
• Small handfuls of soil
Every time you water the garden, water the basket first.

Swamp milkweed (asclepias incarnata) newly planted in the keyhole garden.
What to Plant in a Keyhole Garden
You can grow almost anything, but these plants thrive especially well in Texas keyhole gardens.
Best Choices for Vegetables
• Tomatoes
• Peppers
• Squash
• Cucumbers
• Lettuce
• Kale
• Beans
Best Herbs
• Basil
• Oregano
• Thyme
• Rosemary
• Parsley and/or cilantro
Texas-Friendly Flowers for Pollinators
• Milkweed
• Rudbeckia
• Blue mistflower
• Zinnias
•See the full guide of native plants for pollinators in Texas.
For a butterfly-focused garden, place taller nectar plants around the back and shorter plants near the front.

This is the fun part: keyhole is built and it’s time to do a trial plant layout before plopping them in.
Long-Term Care
A well-built keyhole garden requires very little maintenance.
Tips:
• Add kitchen scraps to the compost basket weekly.
• Water only when the top 2 inches feel dry.
• Refresh mulch each season.
• Top off the soil with 1–2 inches of compost each spring.
Over months, the internal layers can settle—this is normal. Add more soil if needed.
Conclusion
A keyhole garden is one of the most rewarding, sustainable, and low-maintenance garden structures you can build—especially if you live in a hot, drought-prone climate like Texas. With built-in composting, efficient water distribution, and a nutrient-dense soil foundation, keyhole gardens let you grow more with less effort.
If you want a garden system that is productive, eco-friendly, and designed for long-term success, a keyhole garden is a beautiful place to start.
If you are planning or planting this season, the Butterfly Garden Cheat Sheet can help you check that the basic habitat pieces are in place.
Related Guides:
The Complete Guide to Butterfly Gardening: How to Attract, Feed, and Protect Butterflies All Year

Leave a comment